External hardware is not strictly
within the scope of Beltower software, but a few hints are offered here.
The most popular sensor design for tower bells is the optical or photo-sensitive sensor,
(although the latest design of proximity sensor could be more reliable).
The latest designs use infrared light to avoid the risk of picking up stray lights in the visible spectrum.
Wiring Diagram
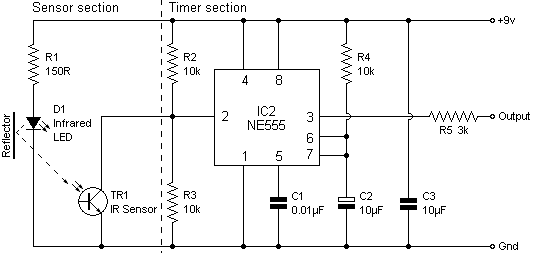
Components
| D1 | |
Infrared Light Emitting Diode | |
Maplin YH70M |
| TR1 | |
Infrared Sensor | |
Maplin YY66W |
| IC1 | |
NE555 Timer | |
Maplin QH66W |
| |
8 pin Dual-In-Line socket (for the NE555) | |
Maplin BL17T |
| |
resistors and capacitors as shown | |
|
| |
small plastic box (eg. MB1 80x60x40) | |
Maplin LH20W |
| |
SRBP matrix strip board 3962 (might do 8 sensors or more) | |
Maplin JP50E |
| |
model makers' silicone adhesive | |
|
| Reflector | |
light reflective material (eg. aluminium foil) | |
|
The +9v power supply is available directly from the COM port,
but the circuit should work just as well with as little as +5v, if required.
The 10k R4 will give a signal lasting about 120ms, which should be fine.
An alternative design allows signals to be adjusted, to last between 20ms and 500ms,
where R4 is replaced with a fixed 1.8k and a variable, up to 47k, resistor.
In this case, it might be preferable to build the Sensor section and the Timer sections separately,
and keep all the Timer sections together (when connecting more than one sensor) near the PC.
The components, as listed, are likely to cost about £15 for one sensor and £60 for eight,
but, with P&P costing about £4 a time, mistakes can add considerably to the cost.
Assembly
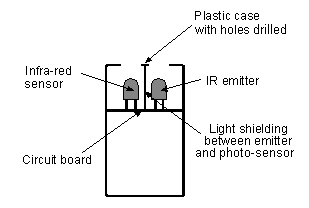
Build the components on strip board or a printed curcuit board.
The box should be drilled, so that the light from the LED will shine out of one hole
and be reflected, through the other hole, on to the sensor.
Within the box, the sensor must be completely shielded from any stray light from the LED,
and it might also be beneficial to apply clear red film over the hole.
Mount the assembled components, as shown below, using the thick silicone adhesive.